Thursday, April 3, 2014
Painting with pulp
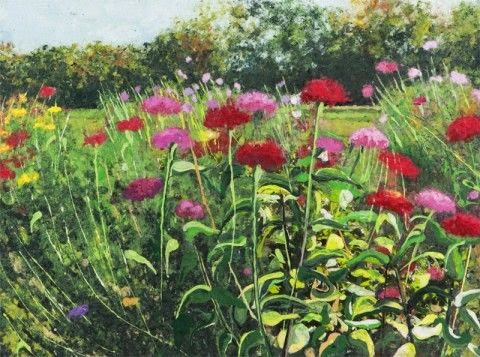
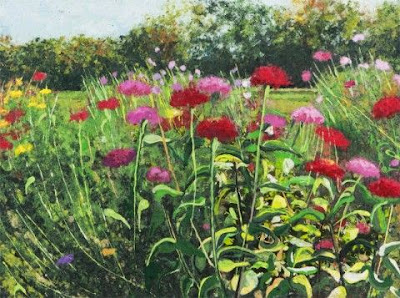
I can’t wrap my head around this artwork. It looks like a pretty pastel painting, done on an easel beside a view. But it is not. It is all made with wet paper pulp, painstakingly dyed and applied to a screen in little precise bits at a time to create a whole picture. It has to be done inside a studio with screens and vats and buckets of pulp. No paint of any kind is added to the surface. I don’t how she does it, but I imagine paper artist Meg Black must have to completely plan it on paper with a pen before starting. What really boggles my mind is how she is able to capture such lovely colors. When paper pulp is wet, it is much darker than it looks when it dries. To get all the different shades just right while working with wet pulp ... well, she must be infinitely patient. I have admired her artwork for years, especially because I have tried “pulp painting” before. There are additives in correct proportions that must be used to thin the pulp so the painter is able to manipulate it. For instance, an artist can make very fine lines by putting the pulp into a squeeze bottle; however, untreated pulp will clump and clog the nozzle. If you would like to see my attempt at pulp painting, scoot down a page or two in this blog to the entry, “Valley Artisans Market.” You can see my pulp painting on the wall in the photo. Trust me, it looks nothing like Meg’s work! To see more of her wonderful creations, go to www.megblack.com.

Saturday, March 29, 2014
Stains
I make paper for a living. This means that I stand in front of a vat of paper pulp that splashes and sloshes. So, as you might imagine, I wear sweatpants and old shirts that are stained with a rainbow of different colors of paper that I have made (that might sound a lot better than it actually looks!), and shoes that often have little bits of wet and/or dried paper pulp on them. I have even found bits of paper in my hair after an especially productive day - or worse, some hair in my paper!! Of course, I also have a busy life with errands that take me out into public life. I have my daily post office run, and I may have to run to Staples for business supplies or duck into the market to get groceries while I let things dry between batches of paper back at the studio. What am I trying to say? I look like a total slob. All. The. Time. I could hide most of my stained clothing inside a long winter coat for the last 6 months. But if spring ever finds us, I am going to have to come up with a new plan. Now what did I do with the bleach?
Friday, March 21, 2014
Something old, something new
I adore handmade things, old things, things with a story and another life that they lived before me. My house is full of objects purchased at auctions, estate sales, antique shows and handed down through the generations. I love pieces, whether it is art on the wall or furniture, where you can see the hand of the person who made it. I believe in investing in goods things once that are well made and will last.
So when I was making over my new studio, I came upon a photo of the perfect work desk. Better yet, it was in an antique store just a few miles from my house. I loved it because it was a good height for standing and working; it had great surface area for packing up orders as well as spreading out a project; and the storage was perfect: lots of drawers for all my junk and a wide open area for the unruly shipping boxes for which I am always trying to find a home. This is what the piece looks like:

I was so excited that I grabbed a tape measurer and jumped in my car to go see it that day, pretty sure that I was going to buy it and trying to anticipate how much they were asking for it and how much I can haggle with them for the best price. When I got to the store, I couldn’t find it anywhere. When I inquired about it, they said it had sold. I left crestfallen, certain I had missed out on the only piece that would work for me. A week later, when he realized I had talked about the piece every single day, my better half suggested we ask a neighbor to build something like it for us. He is a very skilled cabinet maker and made all of our kitchen cabinets for us years ago, and had just finished working with us on a bathroom remodel. I really wanted something with history and wear but I reluctantly took some measurements and made some sketches. Long story short, here is the piece:

Turns out it is much better than the original piece I wanted to buy! It was MUCH cheaper, plus I was able to give the exact dimensions for my space AND I added in a file drawer with a lock for all my business paperwork. But my favorite part are the drawer handles. I had purchased these vintage faucets handles to use as towel hooks during our bathroom remodel but decided to use something else instead. I was so tickled when they fit just perfectly on this piece instead. I was surprised at how much easier everything is because of this simple work space and the organization it has allowed me. At the end of this process, I realized how satisfying it is to work with an artisan, to ask for exactly what you want, and to get something that is unique and your vision, and does not have the mark-up of a huge corporation with an overseas bank account. I hope my customers feel much the same when they work with me and I create them handmade paper for their lives and events. What a lovely thing handmade is!
So when I was making over my new studio, I came upon a photo of the perfect work desk. Better yet, it was in an antique store just a few miles from my house. I loved it because it was a good height for standing and working; it had great surface area for packing up orders as well as spreading out a project; and the storage was perfect: lots of drawers for all my junk and a wide open area for the unruly shipping boxes for which I am always trying to find a home. This is what the piece looks like:

I was so excited that I grabbed a tape measurer and jumped in my car to go see it that day, pretty sure that I was going to buy it and trying to anticipate how much they were asking for it and how much I can haggle with them for the best price. When I got to the store, I couldn’t find it anywhere. When I inquired about it, they said it had sold. I left crestfallen, certain I had missed out on the only piece that would work for me. A week later, when he realized I had talked about the piece every single day, my better half suggested we ask a neighbor to build something like it for us. He is a very skilled cabinet maker and made all of our kitchen cabinets for us years ago, and had just finished working with us on a bathroom remodel. I really wanted something with history and wear but I reluctantly took some measurements and made some sketches. Long story short, here is the piece:

Turns out it is much better than the original piece I wanted to buy! It was MUCH cheaper, plus I was able to give the exact dimensions for my space AND I added in a file drawer with a lock for all my business paperwork. But my favorite part are the drawer handles. I had purchased these vintage faucets handles to use as towel hooks during our bathroom remodel but decided to use something else instead. I was so tickled when they fit just perfectly on this piece instead. I was surprised at how much easier everything is because of this simple work space and the organization it has allowed me. At the end of this process, I realized how satisfying it is to work with an artisan, to ask for exactly what you want, and to get something that is unique and your vision, and does not have the mark-up of a huge corporation with an overseas bank account. I hope my customers feel much the same when they work with me and I create them handmade paper for their lives and events. What a lovely thing handmade is!
Saturday, March 15, 2014
How to find a good craft show
I have sold my work at craft shows for the last 25 years or so. My very first show was in the cafeteria at the newspaper where I worked. There were so many creative people working there who had side businesses in the artistic world that someone decided we should ban together and have a show one day during the lunch hour. It was such a blast! I had such success and positive feedback I launched myself into a serious craft show schedule for the next decade or so.
As successful as it was, I sold my work for next to nothing, my inventory was bought out and had my first lesson in valuing my own work and pricing it correctly. No matter how many shows I went on to do, I learned something every time, even after being a 20+-year craft show veteran. I haven’t had a booth at a craft show for a few years because my art sells so well locally and online that I have no extra time for shows. While I don’t miss the packing, unpacking, setting up, long days on my feet, packing agin and unpacking again, I do miss everything else about a good craft show. I loved the customers, their feedback, their curiosity about my work and process, the thrill of the sale, talking with my neighbor artisans, the ideas for new work...
When I was starting out, the hardest thing for me was pairing up with the right show. I did eventually figure it out, and part of the process depends on asking the right questions to the promoter before you even sign up for the show. The following are my top ten questions to ask before you pay your application fee:
1) How do you advertise? Radio, TV, billboard, direct mail?
2) How are assignments made for more desirable spaces?
3) Do you fill spaces by category?
4) How many spaces are being rented for the entire show?
5) How many applications were received for last year’s show? How many vendors were admitted?
6) What kinds of crafts have been exhibited in the past?
7) What is the recommended price range for work in this show?
8) Is there an entrance fee for customers to get in?
9) What’s the anticipated attendance this year? What was the attendance last year?
10) Are there artists I can contact from the previous year to ask about the show?
I had my questions written up into a full article by a lovely blogger, Brittany. For the expanded article — which includes explanations and insight into all the questions you should ask — go to http://brittanysbest.com/2013/04/vendor-virgin-must-ask-questions/
As successful as it was, I sold my work for next to nothing, my inventory was bought out and had my first lesson in valuing my own work and pricing it correctly. No matter how many shows I went on to do, I learned something every time, even after being a 20+-year craft show veteran. I haven’t had a booth at a craft show for a few years because my art sells so well locally and online that I have no extra time for shows. While I don’t miss the packing, unpacking, setting up, long days on my feet, packing agin and unpacking again, I do miss everything else about a good craft show. I loved the customers, their feedback, their curiosity about my work and process, the thrill of the sale, talking with my neighbor artisans, the ideas for new work...
When I was starting out, the hardest thing for me was pairing up with the right show. I did eventually figure it out, and part of the process depends on asking the right questions to the promoter before you even sign up for the show. The following are my top ten questions to ask before you pay your application fee:
1) How do you advertise? Radio, TV, billboard, direct mail?
2) How are assignments made for more desirable spaces?
3) Do you fill spaces by category?
4) How many spaces are being rented for the entire show?
5) How many applications were received for last year’s show? How many vendors were admitted?
6) What kinds of crafts have been exhibited in the past?
7) What is the recommended price range for work in this show?
8) Is there an entrance fee for customers to get in?
9) What’s the anticipated attendance this year? What was the attendance last year?
10) Are there artists I can contact from the previous year to ask about the show?
I had my questions written up into a full article by a lovely blogger, Brittany. For the expanded article — which includes explanations and insight into all the questions you should ask — go to http://brittanysbest.com/2013/04/vendor-virgin-must-ask-questions/
Wednesday, February 26, 2014
Cupcake toppers!
Sometimes you just have to mix things up a little. I have been happily making my plantable paper items for years. But every few months, I try to add a new product not only for good business practices but also to excite myself and do something different. I have a new product in my shop: cupcake toppers. These are made from my plantable paper shapes that are on a stick. You simply push the stick into a cupcake and — voila! — a really pretty and colorful addition to a cupcake in seconds. Party guests can pluck off the plantable shape and plant it in their garden or force it indoors and grow wildflowers. Skip the expensive cake decorating class and save your money on those dyes for frosting. Since cupcakes have been all the rage for a couple of years, I have been enjoying more of them myself. I used these cupcake toppers as a good excuse to visit my local cupcake shop. I needed only one for a photo prop but I couldn't decide between red velvet, chocolate with vanilla frosting or raspberry lemonade so I got all three!
I have a hunch that these toppers might not be very good sellers but they are fun and different so I thought I would explore them a little bit. If you would like to see more, go to my Etsy shop at http://PulpArt.Etsy.com


Thursday, February 20, 2014
Paper sculpture
If you are into paper and paper arts like I am, you will find Beijing artist Li Hongbo's work absolutely stunning and intriguing. He makes artwork from thousands of layers of paper so that they look like carved porcelain human forms of busts and skulls. Not only can I not imagine the patience it must take to create these works, I also can't imagine how many weeks of work are wasted if the paper is torn or damaged. Yikes!
http://www.thisiscolossal.com/2013/02/the-flexible-paper-sculptures-of-li-hongbo/


Tuesday, February 18, 2014
A walk down memory lane
I have been moving my old studio into my new space this week. As I go, I have been cleaning out old files and boxes that I haven’t looked at in years. I have been surprised that the daunting work of moving has actually ignited passion and excitement as I become re-inspired by what has laid quiet in boxes. I am fired up to make new things and excited to remember old things that I have made. In one of the folders was a magazine article about a project I had forgotten about. Back in 2010, I was lucky enough to find myself in collaboration with a group of California artists who were making some very unique wedding favors for a “wedding as art project” event. Two artists were getting married and wanted a wedding that was anything but typical. They ended up having a “festival of interactive and performance art” and my work was included. I worked with artists Bettina Hubby and Ed Ruscha to make the thickest paper I could —it was more than three inches thick! — that they wanted to use for a die cut project. (How they ever cut through that thick of a piece of paper is still a mystery to me.) They cut “I DO” into the paper and used it as wedding favors. It took quite a long time to accumulate the amount of white paper scraps to make such thick paper. I had to build special molds to pour the pulp into and then it took at least a week for each sheet of the handmade paper to dry. I made a couple hundred of them and then shipped them off to California with my blessings and the assumption that, now that my part of the work was completed, I would not hear from them again. I was thrilled when I did hear from Bettina, several months later. After the wedding, Bettina sent me a thank you note with clippings of articles about the wedding from several different magazines, including LA Weekly and The NY Times Style Magazine, with pictures featuring the paper I had made. It reminded me how much I love to collaborate with other artists and how much inspiration I get from those experiences. It makes the dreary work of unpacking and organizing into a treasure hunt. Now back to the unpacking to see what other surprises and memories await! 

To see the entire article in the New York Times Style Magazine, go to: http://tmagazine.blogs.nytimes.com/2011/09/15/seeing-things-getting-hubbied/?_php=true&_type=blogs&_r=0
For the LA Weekly article, go to http://www.hubbyco.com/static/gallery/files/Get_Hubbied_LA_Weekly_.pdf


To see the entire article in the New York Times Style Magazine, go to: http://tmagazine.blogs.nytimes.com/2011/09/15/seeing-things-getting-hubbied/?_php=true&_type=blogs&_r=0
For the LA Weekly article, go to http://www.hubbyco.com/static/gallery/files/Get_Hubbied_LA_Weekly_.pdf
Subscribe to:
Posts (Atom)